Below are some of examples of the variety of work done over the past few months since my last update.
Shower and bathroom floor re-tile work. These are materials of the customers choosing. they did present a particular challenge as the tile for the shower stall had some repeating patterns that required extra planning and advanced lay out to ensure I could achieve what the customer wanted. There was also some water damaged sheet-rock to repair. The old shower tile was demo'd, all sheetrock behind the tile was removed and replaced with hardibacker board. Shower floor tile was removed very carefully to ensure we didn't damage the shower pan below it. All the new tile was set in place, grouted in using a special grout with a polymer base that is impervious to moisture and staining, The entire bathroom floor was tiled after removing the linolium sheet flooring. All baseboards and trim had been removed and repainted before tacking it back in place and caulking it in properly.
BEFORE:
AFTER:
A commercial client of mine, a car wash, contacted me because they had a pipe burst under the concrete but the company they hired to fix the pipe left them another mess to deal with... they jackhammered a jagged hole in the concrete, repaired the pipe and then left leaving all the broken concrete in a pile and the 6" deep hole was left to present a physical hazard and liability concerns. I responded within 24 hours of approval of my quote to "REPAIR THE REPAIR". I cut the concrete off to square the opening, mixed, filled and finished the concrete. This took approximately 3 hours in total.. and it removed the hazard.
The same client also asked me to remove this steel guardshack/ticket booth from the premisis that hadn't been used in about a decade. I was able to use the lift on my truck to hoist up the 1250# object and place it on a trailer to have it hauled away for disposal. Again... not so amazing but it demonstrates the capability I can bring to the table because of the specialized equipment I own.
This client was selling their home and needed a few repairs made prior to the closing. Of the whole list of things I did for them the most noteworthy was the back corner of a 2 story garage that had been struck by lightning. The lightning strike broke out the top of the concrete block wall between the 1st and 2nd stories, broke out several pieces of the siding at the bottom of the 2nd story and bent/twisted the aluminum corner bead. When this happened initially, they contacted a friend who worked for a roofing company who placed a piece of granulated roll roofing material under the edge of the remaining siding and tacked it down to the studs just to dry in the wall and make sure it would shed water. I was able to cut away the excess roll roofing to expose the broken concrete block, mixed some fast set mortar and made the repair to the block.. The customer had a few extra pieces of the same siding (unpainted) still in the garage so I was able to use those to replace the major broken pieces of the siding and straighten out the corner bead before putting them in place and securing everything down and caulking it in. I found some old beige paint that was suitable to use to make the repair look a little less noticeable and though not perfect, it is a far cry better than what was and should pass the inspection while keeping the cost of the repair low for the customer.
BEFORE:
DURING:
AFTER:
Same customer and same garage.... I repaired wood rot at the bottom of the front entry door. Additionally, the paint on the door jambs was so old it had all flaked off and what remained was really just a powder.. So after replacing the rotted sections I painted the whole door frame.
BEFORE:
AFTER:
Whole front of house face lift. Customer contacted me about some wood rot in their T1-11 siding and a few other repairs they needed. They had a corrugated fiberglass roof over their front entry way that was weathered and damaged and an improperly installed gutter attached at the same point along with other such things. They took my advice and decided to begin converting all their T1-11 to a cement fiber board siding (hardy panel). There was a natural break in the features of the front of the house that I was able to replace a total of 8 sheets on the left side of the house to repair all the wood rot and told them to wait on replacing the stuff to the right until it begins to fail. Their corrugated roof was replaced with tinted plastic corrugated roof panels and a new aluminum gutter was assembled and installed properly to replace the old plastic one that leaked and which the front door would rub along the bottom of when opened. They decided to update the security door at the front of the courtyard entryway also. After all the materials were replaced and installed, I pressure washed the remaining portions of the front and the entire driveway and then painted the entire front of the house for them. They decided to brighten things up with a brilliant blue color and a beige trim they chose. It really makes a world of difference in how the house presents and definitely increased the curb appeal.
BEFORE:
AFTER:
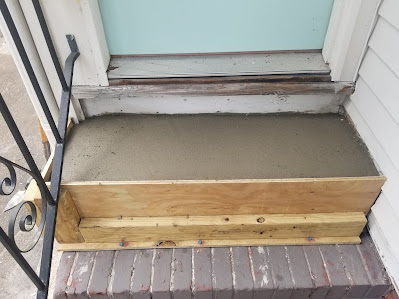
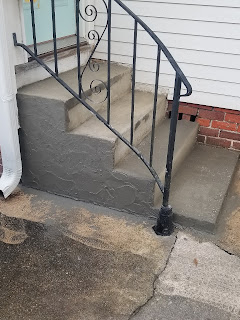
This next project was one for special needs or so to speak. The customer had me trim back some trees on her property but the second job she needed done was to accommodate her diminutive stature as she only stood a towering 4'8". The brick stairs going into her house nearest to where she parked were built in such a way that the top step was very narrow in depth.. less than 8" not providing enough space to stand by yourself let alone with an arm full of groceries or other items while trying to unlock and get in the door. The second problem was the step height from that top step to the landing inside the door was almost 12" ... significantly taller than the normal step height of 8-9" and particularly troublesome for a woman of her height. After listening to her describe the problem and taking a few measurements I decided the easiest and most cost effective way to resolve the problem for her was to pour concrete over the brick to raise the level of each step a few inches up and out. She agreed to the course of action and I began to cut and modify her aluminum siding, build a form and mix the concrete to raise and expand each step. Below are some before, during and after photos that end with a stucco coating over the brickwork to the outside of the steps to give the whole thing some continuity in appearance. She reports that it makes a world of difference.. she no longer feels like she will fall backwards trying to get into the house and the normal step height makes things much easier on her.


No comments:
Post a Comment